Blog
21 April, 2024
June 6, 2023
Migrating Dedicated Linked Clone Desktop Pool to Manual Full Clone Desktop Pool in VMware Horizon with PowerShell
Introduction:
In this blog post, we will explore a PowerShell script that addresses the crucial need to migrate virtual machines (VMs) from dedicated linked clone desktop pools to full clone desktop pools in VMware Horizon before upgrading to Horizon 8. By migrating the VMs, we ensure that end-users can seamlessly transition to the new full clone desktop pool while retaining their work environments.
The Challenge:
Safeguarding User Information During the Migration Process.
During the transition from dedicated linked clone pools to full clone pools in VMware Horizon, organizations often face the dilemma of how to retain user-specific data and configurations while ensuring a seamless migration. Simply replacing existing machines with new ones can result in data loss and disruption to user workflows.
The PowerShell script we will explore in this blog post effectively solves this challenge. It automates the migration process while preserving user information, allowing organizations to seamlessly upgrade to Horizon 8 without sacrificing critical user data and configurations.
By leveraging this script, organizations can ensure a smooth migration experience for their end-users, providing them with a consistent and uninterrupted working environment. Let’s delve into the script’s functionalities and discover how it tackles this challenge head-on.
The Need:
The VMware Horizon 7 is reaching its end of life on April 30, 2023. It becomes imperative to expedite the upgrade processes to Horizon 8. This script offers a solution to efficiently migrate VMs, facilitating a smooth transition to the upgraded Horizon environment.
Prerequisites:
Before running the script, ensure the following prerequisites are met:
By fulfilling these prerequisites, you will be ready to proceed with the VM migration process using the PowerShell script. Stay tuned for the subsequent sections, where we will guide you through the script’s execution and the benefits it brings to your Horizon 8 upgrade.
The script is available to download from our git repository:
https://github.com/TeraSky-OSS/digital-workspaces/tree/main/scripts/migrateLinkedClonetoFullClone
The script automates various tasks involved in the migration process, streamlining the entire process and simplifying the transition to Horizon 8. Let’s delve into the details of each task and discover how this script can optimize your migration process.
Task 1: Importing the Computers List: Before beginning the migration process, the script imports a list of computers from a text file. The list contains the names of the VMs to be migrated. You can easily customize the location of the text file to match your environment.
Task 2: Moving Computers to the Target OU: To ensure proper organization, the script moves each computer from the existing Organizational Unit (OU) to a specified target OU using specific credentials. This step ensures that the VMs are located in the correct OU after the migration. You can customize the source and target OUs based on your Active Directory structure.
Task 3: Connecting to vCenter: In this task, the script establishes a connection to the VMware vCenter server using the provided credentials. This connection is essential for performing various operations on the VMs during the migration process. Make sure to replace the placeholders with the appropriate vCenter server address, username, and password.
Task 4: Shutting Down Source VMs: To prepare for the migration, the script shuts down each source VM from the imported list. It iterates through the list, gracefully shutting down each VM by leveraging the Shutdown-VMGuest cmdlet. This ensures that all VMs are powered off before proceeding to the next steps.
Task 5: Renaming Source VMs: To distinguish between the original linked clone VMs and the newly created full clone VMs, the script renames each source VM by appending “_old” to its original name. Renaming the VMs allows for a clear distinction between the old and new clones during the migration process.
Task 6: Cloning Source VMs to New Folder: Using the vCenter connection established earlier, the script clones each source VM to a new folder within the vCenter inventory. The target folder path can be customized to suit your environment. Additionally, the script randomly selects a host from the specified cluster and utilizes a predefined datastore for the clone operation. This step ensures that the VMs are distributed across the cluster and allows for optimal resource utilization.
Task 7: Removing Network Cards from Source VMs: Before finalizing the migration, the script removes the network cards from the source VMs. By removing the network adapters, any potential conflicts with the cloned VMs are avoided. This step prepares the VMs for network reconfiguration during the migration.
Task 8: Removing Second Hard Disk from Target VMs: In the migration process, removing any unnecessary components from the target VMs is essential. This task involves removing the second virtual hard disk from each target VM. Removing the additional hard disk ensures that the VMs only have the necessary resources and reduces any potential complexities.
Task 9: Adding Migration Note to Source VMs: To provide documentation and a reference point for the migrated VMs, the script adds a note to each source VM. The note indicates that the machine has been migrated and provides valuable information for future reference.
Task 10: Connecting to Horizon View: To integrate the migrated VMs with VMware Horizon, the script connects to the Horizon View server using the provided credentials. The connection allows for further configuration and entitlement of the VMs in the Horizon environment. Ensure that you update the script with your Horizon View server URL, username, and password.
Task 11: Adding Cloned Machines to Manual Pool: To include the newly cloned machines in the Horizon environment, the script adds each cloned machine to a specified Manual Pool. The Manual Pool ensures that these machines are available to end-users for desktop access. Update the script with the name of your desired Manual Pool.
Task 12: Assigning Users to Cloned Machines: To ensure that the appropriate users can access the migrated VMs, the script assigns users to each cloned machine in the Manual Pool. By mapping the usernames based on the machine assignments from linked clone desktop pool, the script automatically configures the necessary access rights for each user.
Task 13: Entitling Users to Full Clone Manual Pool: To provide entitlements to users in the Horizon environment, the script grants access to the Full Clone Manual Pool for each user. This step ensures that users can access the appropriate desktop resources after the migration. The script automatically assigns entitlements based on the machine assignments from linked clone desktop pool.
Task 14: Removing Entitlement from Linked Clone Desktop Pool: As the migration process completes, it is essential to remove the entitlements from the previous Linked Clone Desktop Pool. This task ensures that users no longer have access to the linked clone machines, preventing any confusion or conflicts in the Horizon environment.
Conclusion:
The PowerShell script presented in this blog post simplifies the process of migrating VMs from dedicated linked clone desktop pools to full clone desktop pools in VMware Horizon. By automating various tasks, such as VM cloning, renaming, network reconfiguration, and Horizon integration, the script streamlines the migration process and ensures a smooth transition for end-users. With the provided instructions and customization options, you can adapt the script to fit your specific environment and migration requirements.
Now all you need to do is remove the linked clone pools from your environment and uncheck the definition of the composer in VMware View Admin.
1. Remove the linked-clone desktop pools created by View Composer.
a. In Horizon Console, select Inventory > Desktops.
b. Select a linked-clone desktop pool and click Delete.
A dialog box warns that you will permanently delete the linked-clone desktop pool from Horizon. If the linked-clone virtual machines are configured with persistent disks, you can detach or delete the persistent disks.
c. Click OK.
The virtual machines are deleted from vCenter Server. In addition, the associated View Composer database entries and the replicas created by View Composer are removed.
d. Repeat these steps for each linked-clone desktop pool created by View Composer.
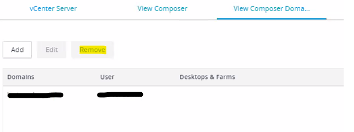
2. Go to Settings -> Servers.
3. On the vCenter Servers tab, select the vCenter Server instance with which View Composer is associated.
4. Remove User Account
5. Select Do not use View Composer.
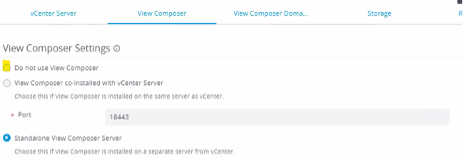
And click OK.
Now you are ready to upgrade the environment to Horizon 8 ????
Happy scripting!
Disclaimer: The PowerShell script showcased in this blog post is the intellectual property of Ofir Dalal, an EUC Specialist at TeraSky EUC Company. Please ensure that you use the script responsibly and in accordance with your organization’s policies and guidelines.
Written by: Ofir Dalal, End User Computing Specialist